Kitchen Corner

Bread Recipes

[Bread][recentbylabel]

Featured

[Featured][recentbylabel]

Wednesday, August 5, 2020

How to Make a Perfect Classic Margarita

How to Make a Perfect Classic Margarita

There are many margarita recipe in the world today, but only one that is original. The classic margarita recipe is one of the easiest cocktails you can make from your home. Here’s how to make a perfectly classic margarita in just a minutes.

The secret on how to make a perfect margarita is in its simplicity and the perfect ratio. It’s simple and uses only 3 ingredients.

  1. Tequila
  2. Cointreau
  3. Lime juice

Did you know that a classic margarita doesn’t even use added sugar?

The best tequila for margaritas


Tequila is the base on how to make a perfect margarita. But how do you pick which one to use? The best tequila is originates from  Mexico. But wherever it comes from, look for the words 100% agave on the inggredient label. If they aren’t 100% agave, the tequila might also include corn syrup, sugar, artificial flavors or colors.

Most bartenders say tequila blanco is best for making the perfect margaritas. But tequila reposado also works like a charm.

Lets get into the Recipe

INGREDIENTS


  • 2 ounces tequila made from 100 percent agave, preferably reposado or blanco
  • 1 ounce Cointreau
  • 1 ounce freshly squeezed lime juice
  • Salt for garnish

INSTRUCTIONS


  1. Cut a notch in a lime wedge, then run the lime around the rim of a glass. Dip the edge of the rim into a plate of flaky sea salt.
  2. Place all ingredients in a cocktail shaker with 4 ice cubes and shake until cold.
  3. Strain the margarita into the glass with the salted rim. Fill the glass with ice and serve.

Thursday, July 5, 2018

Triple Coffee Cheesecake

Triple Coffee Cheesecake

Triple Coffee Cheesecake: Savory Sweet and Satisfying

Oh my goodness, this dessert is amazing!!! I could not wait for dessert every night so I could enjoy a piece of this delicious cheesecake. In fact I would usually see if the family wanted dinner early just so I could eat my dessert sooner.

Triple Coffee Cheesecake: Savory Sweet and Satisfying

This cheesecake is rich and flavorful without being overly sweet. Even my husband, who is not a dessert fan enjoyed this cheesecake and looked forward to a piece every night.

Triple Coffee Cheesecake

Ingredients:

Kahlua Cheesecake

  • 10 chocolate graham crackers
  • 1/4 cup unsalted butter, melted
  • 16 ounces cream cheese, room temperature
  • 2 eggs
  • 1/2 cup granulated sugar
  • 1/4 cup sour cream
  • 1/2 cup mascarpone cheese, room temperature
  • 1/4 cup Kahlua
  • 1/2 tablespoon espresso powder

Coffee Mousse

  • 1 cup heavy whipping cream, cold
  • 1/2 cup mascarpone cheese, room temperature
  • 1/2 cup sweetened condensed milk
  • 1/4 cup semi sweet chocolate chips, melted
  • 1/4 cup strong brewed coffee
  • 3 tablespoons Kahlua
  • 2 teaspoons unflavored gelatin

Coffee Whipped Cream

  • 8 ounces cream cheese
  • 1/2 cup semi sweet chocolate chips, melted
  • 1/4 cup Kahlua
  • 2 cups heavy whipping cream, cold

Directions:

Kahlua Cheesecake

  1. Preheat the oven to 325º F. Wrap a 9-inch springform pan with several layers of heavy duty aluminum foil stoping just under the lip at the top of the pan.
  2. Place the graham crackers into a food processor and process into fine crumbs.
  3. Add in the melted butter and pulse until all of the crumbs are well coated in butter.
  4. Transfer the crumbs into the prepared springform pan and press down firmly into an even layer to create the crust. Set aside.
  5. In the bowl of a stand mixer, with the paddle attachment, Beat the cream cheese until it is light and fluffy, about 5 minutes.
  6. Add in the eggs, sugar sour cream and mascarpone cheese. Beat until well mixed and smooth with no lumps. Scrap down the sides of the bowl as needed.
  7. In a small bowl, stir together the Kahlua and espresso powder until powder is dissolved. Add to the cheese mixture and mix until fully combined.
  8. Pour the cheesecake mixture over the prepared crust.
  9. Place the springform pan into a bigger pan and pour in hot water until it reaches halfway up the sides of the springform pan.
  10. Bake for 1 hour and 5 minutes to 1 hour and 15 minutes or just until the top is set.
  11. Remove the cheesecake from the water bath and allow to cool for 1 hour before adding the mousse layer.

Coffee Mousse

  1. Pour the cold whipping cream into a medium bowl and whisk until stiff peaks form. Set aside.
  2. In a large bowl, beat together the mascarpone cheese, sweetened condensed milk and melted chocolate. Set aside.
  3. In a glass measuring cup, mix together the strong coffee, Kahlua and unflavored gelatin. Microwave the mixture for 1 minute or until the gelatin is completely dissolved. Let cool for 5 minutes.
  4. Pour the gelatin mixture into the mascarpone mixture and stir until well combined.
  5. Add the whipped cream to the mascarpone mixture and gently fold to combine.
  6. Pour the mousse mixture over the cooled cheesecake and spread into an even layer.
  7. Refrigerate for 30 minutes to 1 hour or just until the mousse starts to firm up.

Coffee Whipped Cream

  1. In a large bowl, whisk together the cream cheese, melted chocolate and Kahlua until smooth and creamy.
  2. Add in the cold whipping cream and whisk until the mixture is fluffy and thick.
  3. Transfer the mixture to a piping bag with desired tip and pipe the whipped cream on top of the mousse layer.
  4. Refrigerate the cheesecake overnight.
  5. Run a knife between the cheesecake and edge of pan, going all the way around, before removing the springform.
Enjoy!!!
*Adapted from Tatyana's Everyday Food.

Tuesday, July 3, 2018

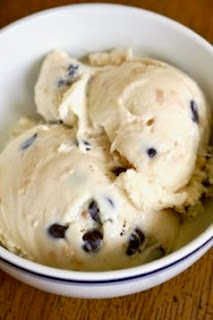
Toasted Coconut and Dark Chocolate Ice Cream

Toasted Coconut and Dark Chocolate Ice Cream

Toasted Coconut and Dark Chocolate Ice Cream: Savory Sweet and Satisfying

A favorite ice cream shop of mine carries a toasted coconut ice cream, that is oh so delicious. I am not sure why I have never decided to make a homemade version before now, but I am so glad I found this recipe and tried it. It has so much coconut flavor and the dark chocolate just made the ice cream even better.

Toasted Coconut and Dark Chocolate Ice Cream

Ingredients:

  • 2 cups heavy cream
  • 1 1/4 cups half and half
  • 3/4 cup granulated sugar
  • 1 1/3 cups shredded coconut, toasted, divided
  • 1/3 cup dark chocolate chips

Directions:

  1. In a medium saucepan, combine the heavy cream, half and half and 6 tablespoons sugar.
  2. Heat the mixture over medium-high heat.
  3. When the mixture begins to bubble around the edges add 1 cup toasted coconut. Allow the mixture to return to a bubble around the edges.
  4. Remove from the heat and cover the saucepan. Allow to sit for 20 minutes.
  5. Over a large bowl, strain the mixture through a fine mesh sieve, pressing on the coconut to extract as much liquid as possible. Discard the coconut.
  6. Cover the bowl and refrigerate the mixture until completely cold, at least 3 hours.
  7. Place a container for storing the ice cream in the freezer.
  8. Once the mixture is completely cold, pour it into the ice cream machine and churn according to the manufactures directions.
  9. During the last 2 minutes of churn time add 1/3 cup toasted coconut and dark chocolate chips.
  10. Remove the container from the freezer and transfer the ice cream into it.
  11. Cover the container and place in the freezer.
Enjoy!!!
*Adapted from Brown Eyed Baker.

Friday, June 29, 2018

How to Toast Coconut

How to Toast Coconut

How to Toast Coconut
Sometimes a recipe calls for toasted coconut and every time I have to look online for the temperature and time. It made me realize that I do not have a lot of "basic" recipes on this blog. So I decided it is about time to start posting some more basic recipes, like toasting coconut.

Toasted Coconut

Ingredients:

  • shredded or flaked coconut

Directions:

  1. Preheat oven to 350º F. Line a baking sheet with parchment paper or a silpat.
  2. Place desired amount of coconut on prepared baking sheet and spread into an even layer.
  3. Place the baking sheet on the middle rack in the oven and bake for 3 minutes. Gently stir the coconut and continue to bake until golden brown, about 3-4 more minutes. Watch carefully because the coconut can burn fast.
  4. Remove the baking sheet from the oven and allow the coconut to cool completely.
  5. Store the toasted coconut in an airtight container for up to one month.
Enjoy!!!

Thursday, June 28, 2018

Pepperoni Pizza Quesadilla

Pepperoni Pizza Quesadilla

Pepperoni Pizza Quesadilla: Savory Sweet and Satisfying

These pizza quesadillas are super tasty and the best part is you can prep all of the ingredients and left everyone prepare their own. That is what I did with my family. I had bowls with various ingredients like, pepperoni, mozzarella cheese, green olives, black olives, banana peppers and bell peppers. Everyone could put on whatever ingredients they wanted and it was such a success with my girls, they loved being able to make their own pizza quesadilla.

Since I was making 4 quesadillas I decided to try and cook them in the oven instead of cooking them in a skillet one at a time. Using the oven worked, the tortillas got nice and crispy, however they did not have a uniform golden brown to them, like in the skillet. So if you need to make a bunch of quesadillas, the oven works great if you do not mind a little uneven color.

Pizza Quesadilla

Ingredients:

  • 8 flour tortillas
  • 2 cups shredded mozzarella cheese
  • pepperoni slices
  • olive oil
  • marinara or pizza sauce

Optional Toppings

  • sliced olives, green or black
  • diced bell peppers
  • sliced mushrooms
  • banana peppers

Directions:

  1. Preheat the oven to 350º F.
  2. Brush 4 of the quesadillas with just enough olive oil to completely coat one side. Place the tortillas olive oil side down on two large baking sheets.
  3. Top each tortilla with about 1/4 cup mozzarella cheese and add any desired toppings. Sprinkle on about 1/4 cup cheese on top of the toppings.
  4. Brush the remaining tortillas with just enough olive oil to completely coat one side. Place the tortillas on top of the cheese with the olive oil side facing up.
  5. Bake on the middle rack for 5-10 minutes or until the bottom is golden brown or reached your desired crispiness. Carefully flip the quesadillas over and bake for an additional 5-10 minutes or until the bottom is golden brown or reached your desired crispiness. Watch the quesadillas carefully so they do not burn.
  6. Serve with pizza sauce or marinara sauce for dipping the quesadillas in.
Enjoy!!!

Notes:
The nutritional info does not include any additional toppings added and does not include the sauce for dipping.


Nutrition Facts

Servings: 4

Amount Per Serving

Calories: 470

Total Fat

33.2g

Saturated Fat

13g

Polyunsaturated Fat

1.4g

Monounsaturated Fat

10g

Trans Fat

0g

Cholesterol

40.9g

Sodium

726.7mg

Potassium

0.1mg

Total Carbohydrates

23.4g

Dietary Fiber

1g

Sugars

1g

Protein

18.9g

Vitamin A 8% Vitamin C 0%

Calcium 46.01% Iron 37.24%

*Nutritional information will vary depending on the brands you use.


*Adapted from Little Dairy on the Prairie.

Wednesday, June 27, 2018

Ham and Cheese Hash Brown Casserole

Ham and Cheese Hash Brown Casserole

Ham and Cheese Hash Brown Casserole: Savory Sweet and Satisfying

Another delicious and easy ham and potato casserole. This is very similar to one I just created, but different enough for me to try it and I have to say it was worth making.

Ham and Cheese Hash Brown Casserole: Savory Sweet and Satisfying

The casserole is super creamy and the parmesan cheese on top adds a nice flavor to the casserole. Plus the parmesan cheese gets nice and golden brown on top.

Ham and Cheese Hash Brown Casserole

Ingredients:

  • 32 ounces frozen shredded hash browns
  • 1 pound cooked cubed ham
  • 2 cans condensed cream of potato soup
  • 16 ounces sour cream
  • 2 cups shredded sharp cheddar cheese
  • 1 1/2 cups shredded parmesan cheese

Directions:

  1. Preheat the oven to 375º F. Spray a 9x13 baking dish with cooking spray.
  2. In a large bowl combine the hash browns, ham, soup, sour cream and cheddar cheese, mixing well.
  3. Transfer into the prepared baking dish and spread into an even layer.
  4. Sprinkle the top of the casserole with the parmesan cheese.
  5. Bake, uncovered, for 1 hour or until casserole is bubbly and cheese is lightly browned.
Enjoy!!!


Nutrition Facts

Servings: 10

Amount Per Serving

Calories423

Total Fat

22.9g

Saturated Fat

15.1g

Polyunsaturated Fat

0g

Monounsaturated Fat

2.7g

Trans Fat

0g

Cholesterol

97.8g

Sodium

1419.2mg

Potassium

465mg

Total Carbohydrates

30.6g

Dietary Fiber

2.5g

Sugars

2.6g

Protein

24.2g

Vitamin A 11.2% Vitamin C 8%

Calcium 37.01% Iron 3%

*Nutritional information will vary depending on the brands you use.


*Adapted from Plain Chicken.

Tuesday, June 26, 2018

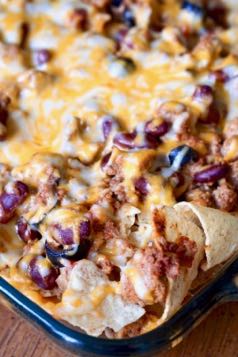
Taco Bake

Taco Bake

Taco Bake: Savory Sweet and Satisfying

This dish has the goodness of tacos in an easy casserole. Plus you can easily customize it to your families tastes. I added some kidney beans to the dish, black beans would also work. Next time I will add some black olives and a diced jalapeño for some heat.

Taco Bake

Ingredients:

  • 1 1/2 pounds ground turkey
  • 14.5 ounce can diced tomatoes with green chilies
  • 1/2 cup water
  • 1 cup sour cream
  • 1 package taco seasoning
  • 15 ounce can low sodium kidney beans, drained and rinsed
  • 8 ounces shredded colby jack cheese
  • 13 ounces tortilla chips

Directions:

  1. Preheat the oven to 350º F. Spray a 9x13 baking dish with cooking spray.
  2. In a large skillet, over medium heat, cook the ground turkey until completely cooked and crumbled.
  3. Add in the diced tomatoes, water, sour cream and taco seasoning. Simmer the mixture for 5-10 minutes or until most of the liquid has been absorbed.
  4. Add the drained beans to the meat mixture and stir to combine.
  5. In the prepared baking dish, spread out half of the chips. On top of the chips, spread out half of the meat mixture. Sprinkle on half of the cheese. Repeat the layers.
  6. Bake for 20 minutes or just until the cheese has melted and is bubbly, do not overcook or it will dry out.
Enjoy!!!

Notes:
If you would like to add any additional ingredients, add them to the meat mixture when you add the beans.

*Adapted from Can't Stay Out of the Kitchen.

Featured

[Featured][recentbylabel2]

Featured

[Featured][recentbylabel2]
Notification
This is just an example, you can fill it later with your own note.
Done